

How To Resize An Image For Printing In Photoshop
In this tutorial, I'thou going to address some things that a lot of people don't know. How to resize an image in Photoshop and go along the best quality. Hither is what I'm going to encompass.
I am using Photoshop CC, nevertheless the nuts apply to every version of Photoshop, although the resize dialog box and options are a bit newer in CC. Don't forget to check out the video for a full walk through and wait at the written info below for more details or specific topics.
How to resize an epitome in Photoshop for best quality. Best settings for resizing, enlargements and reductions of image sizes in Photoshop. Ultimate guide to resizing
Kickoff of all, I created a examination image. This contains, fine lines, thicker text, fine curved lines, gradients and an paradigm so you can see the results on different types of images. Grab the image correct hither to test for yourself. (right click and save the image below).
How to resize an image in Photoshop
It's very easy to resize an image. Cull Epitome>Image Size
Y'all will come across this dialog box.
- Make certain resample is turned on
- Plough on the chain link if y'all want the width and height to change together. If non, turn off the chain then that yous can prepare your own width and height.
- Cull your new size (yous can choose cull different measurement units by clicking on "inches")
- printing ok
That's all you lot need to practise to resize your images. Keep reading for more than details on how to get the best results if you are ready for that info.
How is Resolution really measured?
Without overly complicating things, the resolution is what yous see on screen or in print. On screen you meet pixels of light and in print you run across dots of ink. This is where the terms DPI (dots per inch) and PPI (pixels per inch) come up from. In an over simplification, you tin can think of them equally the same thing, still dots refer to print and pixels are a digital display. Many people mistakingly talk nigh DPI on screen, this is wrong, merely now you will know what they mean. DPI and PPI are both a way to describe resolution .
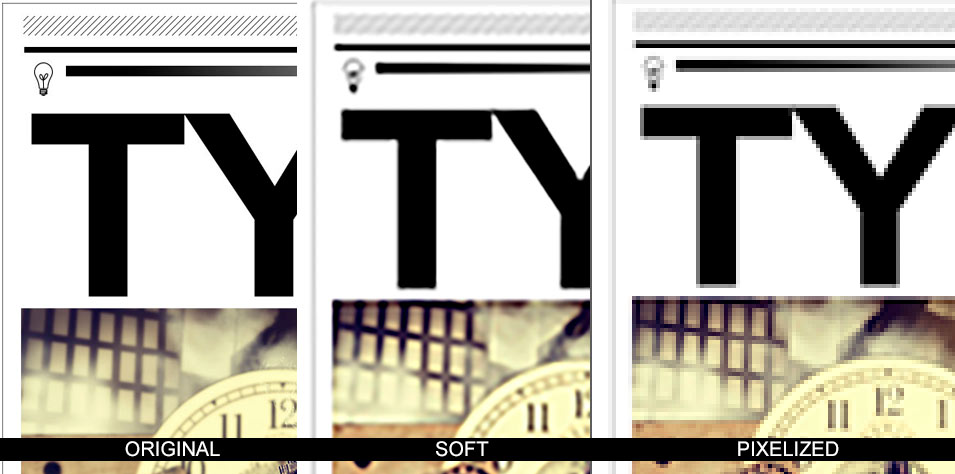
You accept heard the terms hi-resoluton, or low-resolution, or depression-res. This ways how dumbo are the pixels (or dots). More density = more than resolution, or detail. If there is not enough resolution (image isn't big plenty) then you lot will see a noticeable softness to the image, or even jaggies (also chosen pixelization). Also much resolution, won't impact the image display quality, you will just have an unnecessarily large file. So allow's find the best resolution for your needs.
The goal is to keep the quality as close to the original equally possible and this commodity volition evidence to how to do that. This is ane of the big things that split the pros from the amateurs, the quality of the final images.
Digital Resolution explained
Every screen has a native resolution, maybe its 750 x 1334 pixels or 326 ppi as the iphone retina. 326 refers to 326 square pixels fit into 1 square inch of the display to perfectly match the screen size. But a better way to measure screen resolution is with overall pixels.
- For example many monitors (Hd) are 1920 pixels across by 1080 pixels high. 1920×1080.
- 4K (Ultra HD) is 3840 x 2160.
- A Canon 5d Mk4 camera is approx. 30 Megapixels (Mega = a meg pixels). 6720 x 4480 pixels (6720×4480 = 30,105,600 pixels).
Print Resolution explained
Print is measured in dots per inch (DPI) (LPI Lines per inch or line screen is used in commercial printing). If you accept more than dots in a square inch, you volition accept more than resolution or detail in your print. Typical impress resolution is 300dpi (some inkjet printers print better at 360 or 240 for example, wait at your specs). This means that there are 300 dots of ink per square inch or printed cloth. If your image is less, it will look soft, if its larger, at that place is no benefit as a printer can't print beyond its maximum resolution. Ok, how to tell if it's the correct size?
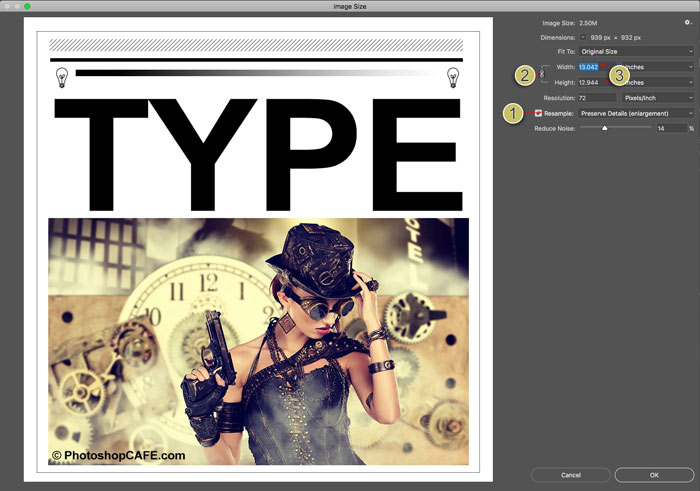
- In Photoshop choose Image>Epitome size
- Plough OFF resample.
- Enter your target resolution into the Resolution filed, in this case 300ppi (if you are targeting 300 DPI, PPI is the digital equivalent)
You volition at present meet that a 939 x 932 pixel image tin print at 3.13 10 3.1 inches and look prissy and precipitous at 300ppi/300dpi. If you need to it print larger you either need to select a larger image or scale the epitome upwardly (resample).

The problem with sampling up (enlarging) is that you lot will lose image quality. The larger you make it, the more than quality you lot volition lose. If y'all demand to scale the epitome down (reduce) and then the quality loss isn't then much as effect, although y'all may need to sharpen an image if you shrink it besides much (more about that soon).
How to draw an epitome size
If someone asks for an image of a sure size, only proverb "4×6 inches" or "at 300dpi" doesn't give you enough data. Sometimes people even go as far equally to say "300 dpi at 12Mb," this doesn't help either because the file size doesn't really have bearing on the physical size of an image because file compression and file type all issue this. What you need to know id one of two things, either
- The overall pixel dimensions. Say 3000, 4000pixels.
- Provide the target size AND resolution. For example, iv×vi inches at 300DPI/300PPI. (See how to crop to an exact size and resolution)
Resizing an Image and Photoshop Interpolation
When you change the size of the epitome, Photoshop has to recreate the pixels. Photoshop needs to know how to jam the pixels together and which ones to throw away when you lot scale down. Information technology likewise needs to know how to create pixels when scaling up. This procedure is calledresampling. When you calibration an epitome fifty-fifty past a single pixel, the entire epitome is resampled or rewritten. This is why creating the image at the correct size in the first place is great. However, don't fear, Photoshop does a really groovy job of resampling and many times you will never be able to come across the deviation in quality.
In order to resample, Photoshop has to practice some math to know how to recreate pixels. This math is choseninterpolation (in-terpol-ation). Interpolation is important because certain types of interpolation volition requite you better results for different types of images. I'grand going to try to keep this as not-technical in simple language and guide you to the best options. At that place were originally 3 types of interpolation in Photoshop (hither is a non-scientific way for you to look at them).
- Nearest neighbor – Remember of this as looking at the nearest pixel and matching its color and tone.
- Bi-linear – Recollect of this as looking at the 4 surrounding pixels and finding the average
- Bi-Cubic – similar looking at the 16 surrounding pixels and finding an average. Simply giving more weight to the 8 closest pixels.
Typically bi-linear is all-time for line art and uncomplicated graphics, where are bi-cubic is all-time for photos and graphics containing gradients, but await, it doesn't end hither.

Adobe added two more than types of Bicubic (In Photoshop CS3). They added:
- BiCubic Smoother: Smoothens out artifacts created in enlargements
- Bicubic sharper: Sharpens to bring dorsum lost details while reducing a file
(Run across what features were added in which versions of Photoshop in our free superguides)
There are 2 more than options what are they?
Automatic (Photoshop CS6) , it selects Bicubic Smoother (CS6) / Preserve Details (CC) when enlarging and information technology chooses BiCubic Sharpener when reducing images. Automatic is easiest almost of the time, but keep reading considering it might non all-time the best pick all the fourth dimension.
Stair Stride Interpolation
There is a "secret squirrel handshake" for experienced Photoshop users "in the know." This secret is frequently credited to Fred Miranda, for discovering the stair step interpolation. It works similar this, when yous overstate or reduce an paradigm, rather than just jump to the final amount, scale information technology up or down at ten% at a time. You will come across a marked improvement in your image sharpness and final quality IF you are using CS6 or the older interpolation algorithms.
However, on testing I have found that Preserve Details produces the aforementioned result as stair footstep and I hazard a guess that some of that is built into the newest algorithm. This was 1 of the unsung heroes in the outset release of Photoshop CC.
Ok Colin, enough! Which is the best resizing method to utilize?
Ok, this is where the safety hits the road and it's a good fourth dimension for you lot to open the test image into Photoshop and examination for yourself. You can also see me exam it on the video above.
I take institute for upscaling that Preserve Details works really well for for many images, especially line art and graphics images (although for elementary line art, sometimes bi-linear yields amend results). Notwithstanding, sometimes for photographs bi-linear smoother can produce a more natural (although softer) results which has less halos and artifacts. You tin always apply some sharpening to the result. The results depend on how much you are scaling up the image and as well how detailed the image is vs large gradient areas such as skies in photos. So, don't simply reach for motorcar. Endeavor a couple of variations to run across if y'all can coax better results out of Photoshop, sometimes you tin.
Understanding resolution
Check out this commodity I made that explains resolution. Its a uncomplicated explanation of why describing a images every bit 300DPI, 72dpi etc doesn't hateful anything.
Tips for scaling images in Photoshop
Ok, if you are still reading you are either a bit more advanced, or hungry to learn all you can. When y'all are scaling upwardly or down images hither are some tips to keep in mind.
- E'er view images at 100%, there is no other way to tell the true quality every bit this is the only magnification that gives true feedback.
- Consider resizing the image twice, in one case for graphics, and another for photos and then combine the results.
- Use resize presets if you are scaling images to a prepare size often
- Yous can use Image Processor pro to batch procedure a lot of images. File>Automate>Image Processor Pro
- Retrieve the interpolation methods are available for Image Processor Pro, Save For web, export as, besides equally resize.
- If yous are needing to actually overstate an image look at some 3rd party plugins such equally Conflicting Skins Blow up or OnOne's perfect resize (formally known as Genuine Fractals) whomerits they can calibration images up to 1000x and still keep quality.
Thank you for checking out this tutorial / commodity. Don't forget to subscribe to our mailing list (on the top correct of the toolbar) to be informed whenever I post a new tutorial. I usually do a tutorial each week which has BOTH a written and a video component to it for your learning pleasure.
The best style to Learn Adobe Photoshop
If you are really wanting to get a adept grasp of all the goodness in Photoshop, don't waste matter time with tons of disjointed tutorials from "experts" that overlap and sometimes disagree with each other.Your time is YOUR about valuable asset. This is why I put together a comprehensive Photoshop grade that teaches you A-Z all in ane identify. I first started this in Photoshop 5 and accept re-recodred this grade x times over the past 17 years, perfecting it each fourth dimension. I believe its the best mode to learn Photoshop and thousands of people would agree with me. Have a await at Photoshop CC forDigital Photographers (It'southward really for anyone working with images in Photoshop) Over 100 lessons and 13 hours of valuable within information. Information technology's manifestly-english so anyone tin can understand information technology likewise every bit the real-world techniques used by experienced pros. All the lesson files are included and then yous can follow forth with me, step by step. Total 60 money back. Grab in the instant Download or DVD right now.
Thank you guys!
Check out more tutorials on PhotoshopCAFE!
Colin
Source: https://photoshopcafe.com/resize-images-photoshop-keep-quality/
Posted by: schultzhenceld68.blogspot.com
I never knew any of this! I recall some tutorial saying something almost Bicubic being a skillful option in many instances, simply, that was it! LOL Thanks very much!
Su
I apologize that a few of the comments have been deleted. Because of some technical problems I had to reupload this folio.. Feel gratis to repost
Nice
all sites postig topics most make an prototype larger, what most it making it smaller without losing quality, i still looking for a proficient video or a articl since hours but non luck yet -__-
Bicubic sharper for reducing
what I am trying to do is make the image of a lady smaller earlier I identify it on the new back round, and then it looks similar it fits the scene, Im not interested in reducing the size of the finished new image on new back round
whatever thoughts on that subject
I dearest your vid "how to make a blended "
but my question if I wanted the soccer player to be smaller to fit the dorsum circular
HOW
Thanks IN Advance
Nich Mast
Press Ctrl+T and drag the corner to change the size
The lesson is an eye opening for the beginner similar me. Cheers.
I had a query nosotros are at present living in responsive era, so the images that we use in spider web are scale upwardly for big screens and the same images are calibration down on small device so there an idle option for such situations BiCubic Smoother, Bicubic sharper,etc.
When designing you make the image at the largest size it volition be needed, the browser will resize it from there.
Thanks for explaining the resolution, in such detail but, I got stuck on i line "If you demand to calibration the epitome down (reduce) and so the quality loss isn't and so much equally issue, although you may need to sharpen an image if you shrink it too much (more about that soon)."I am waiting More than about that soon 🙂
Its covered in the resizing an Epitome section
Bicubic sharper: Sharpens to bring back lost details while reducing a file
Suppose we have to resize unmarried paradigm which has both (pocket-sized) text and picture and the epitome is calibration down on minor device and scale up on big device, and so is resample the idle option, if yes then under resample which option to consider Bicubic sharper or Bicubic smoother or Preserve particular ?
Thanks but i am still facing issue, i created a logo of 1187X360 but my theme have a logo infinite for 260X80, when i salvage for web devices is blur.. i am looking for a solution.
regards
MJ
My business organization is trying to salvage a panorama of 8 or more than images combined, which makes the file QUITE Large (+4Gb), sometimes PS won't even allow me relieve the file. What'south the best saving method would you suggest for these instances? Thank you in advance for your answer!
Salve these every bit PSB format, they can handle larger files
Thanks for the aid.
I am entering a photo into my first competitive exhibition. The prototype is a composite of 16 individual images stitched together. The combined prototype dimensions are: xi,124 x 18,719 pixels. I have 2 tasks to accomplish and I would capeesh your guidance. ane. To submit the prototype for jury, it needs to exist a maximum of 3mb and the shortest dimension must be at least 1200 pixels. They will print the image on paper (don't know what kind of paper or the dpi printer setting) for judging. I am guessing I should resize the image to maximize its quality but your comments about the image becoming soft suggests for such a large resizing the sharpening needs could be significant. Do you have any suggestions to maximize the quality of this image file across the guidance you have provided? 2. If my image is selected, I will demand to print for brandish at the gallery. My original dimensions would theoretically allow an image of 36″ x 54″ at 300 ppi. Given the prototype is stitched do you know if there is whatsoever take a chance of the boundaries existence visible if printed at the max? As a stitched image, would I be wise to engage in some paradigm reduction to maximize the crispness of the composition? Any guidance would be greatly appreciated.
If its stitched properly, at that place shouldn't be any visible seams.
i want to create a tarpaulin that have a size nine height 30 width whats is the best resolution?
I would ask the printer who is going to impress information technology, what their specs are, they tin can vary widely, deepening on materials, blanket, type of printing etc.
Hello i'g working on ads so i fabricated one artwork size 1080×1080 and i take to resize this aforementioned to more than 86 unlike sizes like example 200×100, 300×250, 160×600 and more then i'thou looking for easy way to practice it because now im making all from get-go every each size theres any way i can exercise quick without making from the scratch. thanks for your help in advance.
use deportment
I'm doing a banner for the front end of a counter at i of our facilities, and the dimensions are 134″x58″ (WxH), which is what I set the prototype size equally when I started the project. Halfway through the project though, I'm getting pretty annoyed with how much the massive file seems to be slowing down my tiptop of the line Macbook Pro (purchased in 2017). I have never heard the fan run on this affair until now.
I am wondering if I make my layers smart objects, then resize the paradigm down to a more than manageable file size, volition I then be able to enlarge information technology back up one time it is gear up to become to the printer without losing quality? I feel like this should work, peculiarly if I make the electric current, edited layers smart objects, merely kind of want to confirm before I waste five hours of work…
Make a copy and examination it, but you shouldn't lose anything if you lot are in smart objects. But examination it
Hi Colin, I accept an image save to a PNG and the quality looks dandy. When the web developer resizes it smaller to fit the space provided in our website, the epitome quality becomes really poor. Is there a way we can keep the quality high?
your freelancer is probably over compressing the image. Mayhap give it to them in the size that's needed for the final
I wish I would have found your informative website sooner! I have read then many slice meal tutorials and I merely become more than confused. Such equally i recommendation for print was to only utilise 600 DPI for press any photograph! I never heard of this and the way the person described that 600 was the best and using annihilation else you were basically a loser in the photography field. Your explanations are clear and piece of cake to follow. Thank you. I will exist following and looking forrard to some of your courses. For sure situations I simply need a refresher on the process.
Squeamish article. From my feel in print production, I accept found that if you first decide the proper monitor resolution and ready that in Photoshop (generally it shouldn't be fix at 72dpi) viewing your image at print size is a chip more accurate as to what you will end upwards with (since no one volition ever encounter your image at 100% monitor size). So for example, I have an Apple Thunderbolt monitor which has a display resolution of 2560×1440. If you measure the bodily width of the screen (in this case 23.4in) and divide 2560 by that number you go a screen resolution of 109. You then enter this into the screen resolution box under Units and Rulers in Photoshop preferences. So when y'all choose view print size, your prototype should measure exactly to its final print size. In my opinion this is a more accurate way to determine if your upsampling will wait ok as a 100% monitor view shows mode more detail than the human eye can see at the size the image will be printed.
hello
I am reducing icon size 24×24 to 16×16 my file is pixcelate what should i do to fix this trubble
Use the downsample option
Hi,
I'm exctracting artwork from PSD/PSB files. Sometimes the size of file gets too high, say 48mb for a 5000×3500 pixles jpg. I need to lower the paradigm size to 10mb in same resolution (5000×3500) while keeping images quality. And setting file on Paradigm Pick fifty-fifty on smallest and lowest quality (0/1) when saving it won't decrease the size and it's still over 40mb.
How-do-you-do Colin
Great column!
What is the max size (%) you lot should scale upwards an epitome before interpolation no longer helps with resolution.
I've e'er gear up a 400% limit.
Thank you!
I'thousand reluctant to put a number on it because it varys from paradigm to paradigm.
what is resolution?
Howdy, I'1000 trying to resize an epitome to fit the imprint of a website. The dimensions are 1920×460, so understandably the image is stretching to fit the dimensions. Is there whatsoever style to hide the stretching? Or is it just an unfortunate side effect? Thanks in advance
Yous could pad the image with a solid color or repeating pattern and set the image to absolute rather than relative sizing. Don't inquire me how to do that though, google the CSS 😉
Hi Colin
Give thanks you for an informative article. I'm trying to resize images to use on a Hd monitor, similar you've mentioned:
"For example many monitors (HD) are 1920 pixels across past 1080 pixels loftier. 1920×1080" with these verbal sizes or the short size may be less than 1080. But what I find is that when it resize automatically the small size is always bigger than 1080 and when I resize the small size to fit 1080, the paradigm is distorted. How do I foreclose the baloney and proceed to the "rule of 1920×1080 (or less)?
Thanks
Also to mention when I resize my images to 1620×1080 it is perfect, no baloney.
Hello Colin,
I've been a fan since taking your online courses for Photoshop and Illustrator. I demand to figure out the resolution when I resize images for utilise in Pan & Zoom furnishings. In the SD days when screens were 72 dpi information technology wasn't a problem, simply at present, I am often given small digital downloads of images to piece of work with and the project is never less than 1920×1080. I've been eyeballing at 100% but would like some guidelines from a pro. Cheers!
Thanks for the nice article well-nigh scaling up/down pictures. Unfortunately, you've got the math of the resolution part totally wrong. E.grand. 300dpi is definitely not 300 dots per square inch only 300 pixels per (linear) inch. For square inch information technology is 300×300=90000 dots per square.
How-do-you-do Colin:
Well described. Notwithstanding, what I withal have difficulty understanding is how to size images for employ on my website. Primarily, I remember, considering it depends on the resolution of not simply my screen only also in the existent world where everyone views my site on different devices with dissimilar resolutions. How do I resize images ie. ingather to fit a given infinite – full frame – when I don't know what the size of that space / container is?
BTW, we've long used 72 ppi as the benchmark for resizing images for viewing online. Nevertheless, some fourth dimension ago I read that well-nigh monitors today are more than likely 95. What do y'all suggest?
Some other great tutorial Colin.
Exercise yous utilise photoshop to resample a image up or practice you use some other program and is at that place a better culling to photoshop? I would like to know what you retrieve.
I utilize Photoshop. Alienskin blow up was pretty good in the day along with Genuine Fractals, I don't know if they fifty-fifty exist anymore or what names they are now using.
Hello Colin,
I need a bit of help.
I have a product image that requires web resizing for a customer and they would like to the image to be at 72dpi.
When zoomed in iii times, the image volition announced slightly blurry, is at that place anyhow around this?
Capeesh your reply!
Hi
I desire to convert JPG and PNG size to WEB size ( 250×300 and 728×xc) How can i do this with PHOTOSHOP? I tried but i accept bug. Cheers very much in advance
Relieve for web
Hi Colin, Thank you for this article. It sounds sensible but didn't piece of work with a pesky prototype I'grand trying to downsize for the web . It is a kookaburra graphic in high res (from Adobe vector stock) that, when I endeavor to reduce it from 3800 x 4000 odd px to 200 x 210 px, using bicubic sharper, looks like total rubbish. I arraign Photoshop. Any thoughts on what might have changed or what I'thousand doing wrong would be most appreciated!
If its vector art, try a different resize setting, bicubic sharper prob isn't best option. Also if its vector, you lot should scale it in illustrator
How-do-you-do Colin, Cheers I'm a new subscriber to your channel. I am setting up files in Photoshop to ship to the printer. Volition the quality still exist optimal if I send a 24 ten 36 inch file to the printer and they print it to the much smaller iv ten vi″ size as well every bit the large impress? It'southward the same aspect ratio. Many Thanks
You might have to experiment. My guess is it will await better in PS because it does better interpolation (resizing) But maybe your print can do it well besides, you would have to try both and see which looks best